A constant struggle in the art world
involves fine-tuning Level of Detail, or LOD. On a current project, I was
presented with a scene that would need thousands of iterations of assets, all
while supporting 90 FPS (the target FPS for VR). I came up with a unique
solution that works, because this scene is laid out inside an aircraft,
essentially a long hallway. Since you only approach objects from the front or
the rear, I decided to use planes for the last LOD level, since they only consist of 4 tris. Here is my process.

When you are
ready to create the last LOD level, set up your scene for the
plane capture
process. Remove all unwanted objects from the scene to stop them from being
rendered.
Create a
backdrop that will contrast well with the asset in question. For most assets, a
green screen works well, but a blue or red screen can also be used. I simple
set up two planes, and applied a StingrayPBS material with a flat color. Be
sure to get rid of all metal and roughness values to create a “flat” material.
Next, set up the lighting for your scene, by selecting Lighting<Use Flat Lights. This will help you get a render shot
that doesn’t interact with light. Since this image plane will be used for the
last level of the LOD group, it is important to have a clean image.

Open up the
Render Viewport and then set the Render type to Maya Hardware 2.0 Then, open up the Render Settings window.

Once opened,
change the Renderable Camera to the
desired one. For most assets, the Front camera will be the best to get a
straight shot of the asset. Additionally, consider rotating the object 180
degrees for the rear render shot, instead of setting up a new camera for a Rear
shot.
Next, change
the image size to HD 720 or better to ensure
you are working with a clean, crisp image.

In the
Render Settings, you also must change the lighting
mode to Default mode. If your render shot is black, its most likely because
this setting is set to “All.” Default
will tell it to use the same lighting you set up in the editor (in this case,
Flat Lighting).
After
getting the setup process complete, you can now render your image. Typically,
its easiest to use the orthographic view for these shots. After you are satisfied,
we can move on to exporting out your render shot.
On the Render View, open up
File>Save Image.
Make sure to
select the options button on the
Save Image tab.

This will
open up another window. Change the save mode to “Color Managed Image – View Transform embedded.”

Once done
with the Save Settings, go back and this time click File<Save Image. Name the asset in a logical manner, describing
the asset, and what shot you are capturing. Next, change the file type to PNG.

Next, bring the image into Photoshop.
Get rid of the background through smart selection or Select< Color Range. It
should be easy to grab all the green and then delete it out of the image. Once
all the background is cleaned from the image, select what’s left and create an
alpha channel.

When you are
satisfied with the image and have an appropriate alpha channel, you can export
the image out. Remember when exporting to always save as a Targa or another
format that allows for 32 bits (an alpha channel). Now you are ready to apply
the image to a plane to be used for the desired LOD level. Test in Maya and if
satisfied, add to the LOD group and name accordingly. Export the LOD group to
Unity. In Unity, make sure the texture is set to pull alpha from transparency and the material is set to Cutout. If one is set up already, add
the LOD group to the desired prefab. If no prefab is created yet, create an
empty game object to house the LOD group and create your own prefab. You can
change the LOD distances in the inspector window for testing purposes. It is
recommended to have the distances between LOD switches stay small to
effectively test the transitions. After successful testing you can change the
LOD switch points back to the standard.
That’s it!
Now you have a LOD level that consists of 4 tris (one plane) and still looks like
a high-fidelity model. Granted, this only works because of the environment
layout (an aircraft is essentially a vey long hallway). If you are working in a
more open environment where the player can approach an asset from many
different angles you might have to change your approach. As it stands, for this
project it was a great solution as the player can really only approach an asset
from the front or the rear. No angled vectors that might ruin the illusion. Here's a render shot:
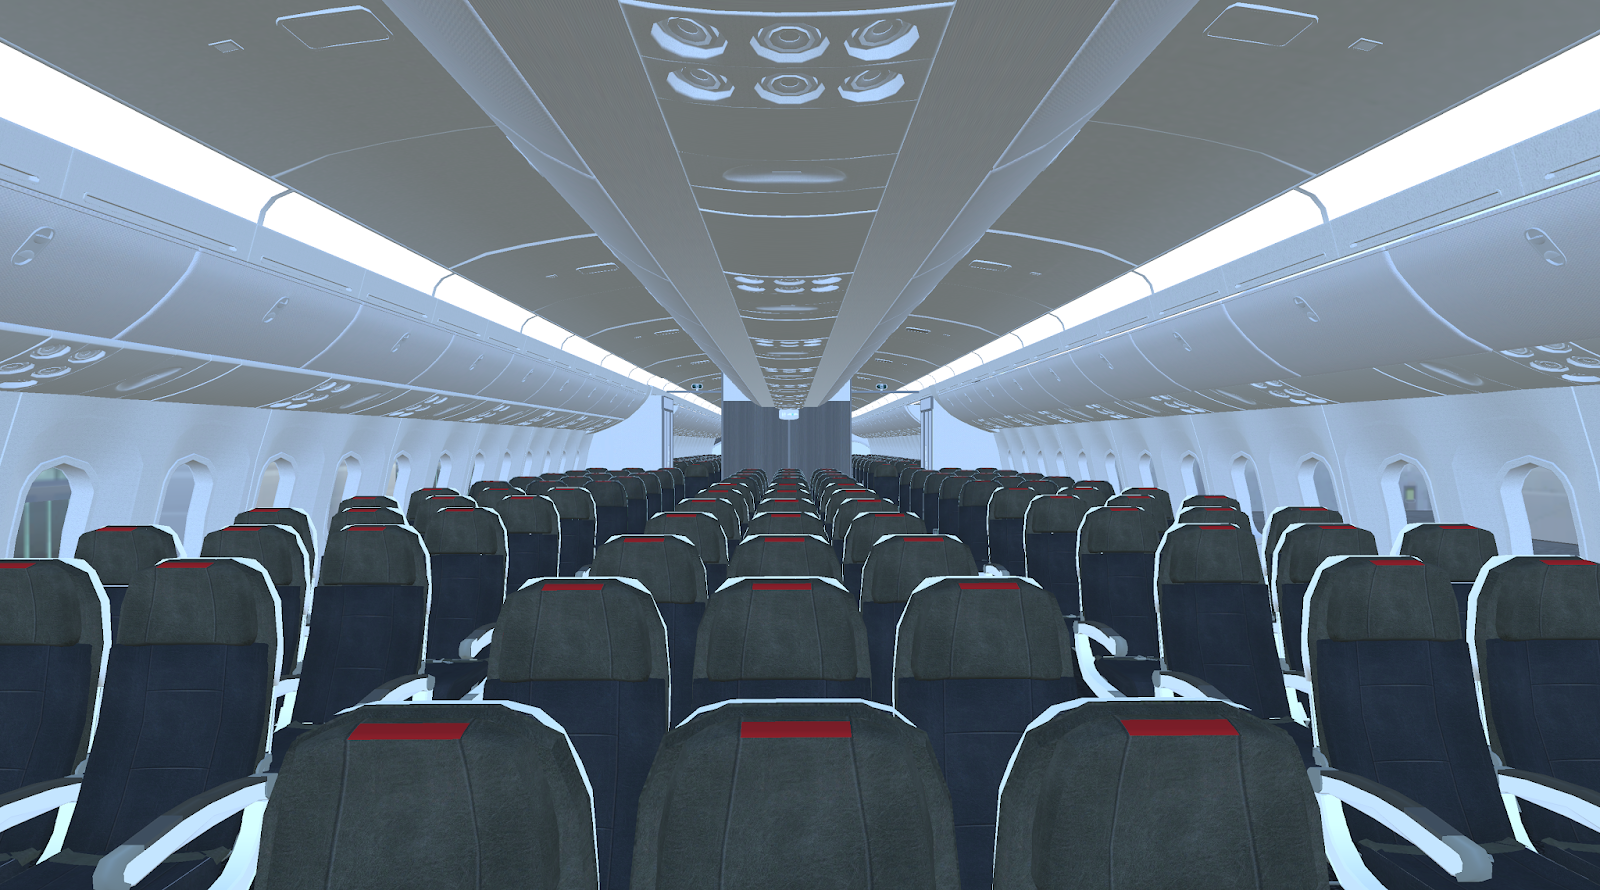

Here you can
see there the plane LOD starts to kick in, about 6 or 7 rows back. At this
distance, the difference is almost imperceptible. It’s a good solution for the
design of the level.
Hope this
little bit of magic will help you in your project or inspire you to something
similar. If so, make sure to share your work and as always, comments and
feedback are encouraged!
Tools Used:
Maya 2018, Unity 2018, Photoshop CC
No comments:
Post a Comment